Hello,
I tried having a contest a few weeks ago on twitter, but there wasn't much of a response. I've heard that a contest is a good way to increase followers and promote a business... where did it go wrong? Thanks, Gareth
Gareth,
I'm not sure what your contest looked like, but there are a few basic tips to make your Twitter contest as successful as possible. As you may know, there are lots of different types of contests you can hold. The most common are hashtag contests and retweet contests. Hashtag contests require users to incorporate specific hashtags (hyperlinked keywords with pound signs in front of them that link to all other mentions of that word). This article has tips on how to track a hashtag contest.
Make sure the content on your Twitter account is interesting and appealing. It doesn't do much good to run a contest and gain more followers if they just come to realize that they have no interest in your tweets (I'm not saying this is what happened necessarily). To avoid being unfollowed or forgotten as soon as the contest is over make sure you have funny or informative content up prior to the contest and after it.
Making your product the prize of the contest showcases your work. Be sure that your product is something people will want, and promote it as such. Giving away something too small or common may actually discourage people from participation. You should also keep the length of your contest in mind. A one-day contest may sound like a great way to make your contest seem urgent, but it may prevent you from reaching a large number of people. At the same time, if you stretch a contest out, it can result in people losing interest or forgetting. The ideal length for a contest is around seven to ten days.
Lastly, entertain people! Retweeting "Win a FREE _______, just RT..." is not going to entice people unless the prize is out of this world. Instead include a fun fact about your product; anything people will find interesting or humorous. Hold a trivia contest or make your promotion a game people will activly engage in. When the contest is over, be sure to announce the winner, and update everyone as to how it went. Hope this helps; let us know if you come accross any more Twitter contest issues.
Wednesday, August 18, 2010
Wednesday, August 4, 2010
Facebook Fan Page Management: Response to Mabel
2:12 PM 52 Comments Facebook
Hey Sarah, I read you post on getting blog followers, it was very good. I’ve just started a Facebook fan page, but I’m not sure what kinds of things to post to it. Also, how do I get more fans?
Thanks!
Mabel
Mabel,
Thanks for your question, and congrats on expanding your social network to Facebook! While it can overwhelming at times to manage a studio, a fan page, a blog, and a Twitter account, most artisans find that it’s worth it for the increase in sales and traffic.
Regarding what to post, take a peek at some of the pages you’ve “liked” on your personal Facebook account. Most likely, you’ll see a post from them every day or every few days with some new article, link, or important update. Generally, if you have a page that updates too often, they end up dominating a news field, which can annoy your fans. Remember, Facebook isn’t Twitter, and if you plan to post your tweets to your Facebook fan page, so do sparingly and make sure they are important updates.
Generally, you should post an update once a day or every few days with news about sales, giveaways, and the occasional newly posted item (try to avoid posting a Facebook update every time you update your store). You can also update them with important information which may not be related to your business, such as a helpful craft business article or venue update. You can use Facebook to promote your blog too, but try not to post an update every time you blog.
You can also use your fan page pictures to create a story of your creations. Post pictures of your work as it progresses to show how you create a piece. Include pictures of your workshop, or a booth you had at a craft show to help fans get to know you better. And don’t forget to put your Facebook Kiosk on your fan page too!
You can gain fans for your Facebook page in a similar fashion to gaining blog followers. Fill out the link on your Market Hub, add your Facebook link anywhere else you can (such as forum and email signatures), promote your page though Twitter and similar channels, and post high quality updates. You can also post a widget/badge for your Facebook page on your blog or any website you run.
You can even promote your fan page through Facebook. Make sure to fan other artist’s pages and comment on their updates and pictures. You may even consider running a Facebook ad campaign for your fan page, although you may choose to reserve this form of advertising for your studio.
Lastly, if your page is brand new…give it time to grow! :)
 Sara
Sara
Sell Handmade Crafts Online
Have a question for the blog? Email it to Sara@ArtFire.com.
Have any other thoughts on good updates or how to get fans for Facebook? Post them in the comments!
Thanks!
Mabel
Mabel,
Thanks for your question, and congrats on expanding your social network to Facebook! While it can overwhelming at times to manage a studio, a fan page, a blog, and a Twitter account, most artisans find that it’s worth it for the increase in sales and traffic.
Regarding what to post, take a peek at some of the pages you’ve “liked” on your personal Facebook account. Most likely, you’ll see a post from them every day or every few days with some new article, link, or important update. Generally, if you have a page that updates too often, they end up dominating a news field, which can annoy your fans. Remember, Facebook isn’t Twitter, and if you plan to post your tweets to your Facebook fan page, so do sparingly and make sure they are important updates.
Generally, you should post an update once a day or every few days with news about sales, giveaways, and the occasional newly posted item (try to avoid posting a Facebook update every time you update your store). You can also update them with important information which may not be related to your business, such as a helpful craft business article or venue update. You can use Facebook to promote your blog too, but try not to post an update every time you blog.
You can also use your fan page pictures to create a story of your creations. Post pictures of your work as it progresses to show how you create a piece. Include pictures of your workshop, or a booth you had at a craft show to help fans get to know you better. And don’t forget to put your Facebook Kiosk on your fan page too!
You can gain fans for your Facebook page in a similar fashion to gaining blog followers. Fill out the link on your Market Hub, add your Facebook link anywhere else you can (such as forum and email signatures), promote your page though Twitter and similar channels, and post high quality updates. You can also post a widget/badge for your Facebook page on your blog or any website you run.
You can even promote your fan page through Facebook. Make sure to fan other artist’s pages and comment on their updates and pictures. You may even consider running a Facebook ad campaign for your fan page, although you may choose to reserve this form of advertising for your studio.
Lastly, if your page is brand new…give it time to grow! :)
Sell Handmade Crafts Online
Have a question for the blog? Email it to Sara@ArtFire.com.
Have any other thoughts on good updates or how to get fans for Facebook? Post them in the comments!
Wednesday, July 28, 2010
Gaining Blog Followers: Response to Sam
10:44 AM 9 Comments Blogging
Sell handmade crafts online:
Love your blog, been following it for a while. I’ve noticed you have LOTS of followers. I’ve just started my own blog, but I don’t know how to get followers, do you have any advice? Thanks so much!
Sam
Sam,
Thanks for the compliments on the blog! There are really lots of ways to get more blog readers and followers, but here are a few techniques I’ve used and read about:
- Add your blog link anywhere you can. Many handmade sellers post their shop links in their email or forum signature, and there’s no reason not to include a link to your blog also well! If you need help adding it, check out this post I made earlier on setting up an email signature. If you have an ArtFire studio, don’t forget to add the link to your MarketHub too.
- Promote your blog through all available channels. If you have a Twitter account, tweet your most recent article. If you run a newsletter, send out an update about your blog. If you’re a handmade seller, use the same means you use to promote your items. Don’t forget to share your new blog in the forums!
- Leave comments on other blogs. Do you have a favorite blog you follow? Leave a comment, and make sure to include your blog link! You want to leave a worthwhile comment which adds to the post. Also be sure to seek out others that are new to blogging or have blogs similar to yours. Remember, blogging is also about making friends!
- Post high quality, original content often. You’ll probably want to update your blog at least twice a week with content people will want to read about. While you should be blogging about what you love, be sure to include education material as well. Posting your favorite recipe (always give credit if it's from somewhere else), a how-to tutorial, or tips for creating at prefect bar of soap can be helpful both for building creditability as a blogger and for keeping readers coming back to your blog. This also means proofreading your blog several times before you make a post!
- Offer giveaways and post interviews. Many bloggers use giveaways to drive traffic to their blog, and often make the requirements for entry as simple as leaving a comment. You can also give away one of your handmade products to both promote your blog and studio. Don’t forget to interview fellow artisans as well, this is great for making friends and encouraging others to link to your blog.
All blogs start off small. Promoting is an ongoing process. Also make sure to use your ArtFire Blog, as this provides entertainment to those already in your studio and keeps them coming back!
 Sara
Sara
Sell Handmade Crafts Online
Have a question for the blog? Email it to Sara@ArtFire.com.
Have any other ideas for promoting one’s blog? Post them in the comments below!
Love your blog, been following it for a while. I’ve noticed you have LOTS of followers. I’ve just started my own blog, but I don’t know how to get followers, do you have any advice? Thanks so much!
Sam
Sam,
Thanks for the compliments on the blog! There are really lots of ways to get more blog readers and followers, but here are a few techniques I’ve used and read about:
- Add your blog link anywhere you can. Many handmade sellers post their shop links in their email or forum signature, and there’s no reason not to include a link to your blog also well! If you need help adding it, check out this post I made earlier on setting up an email signature. If you have an ArtFire studio, don’t forget to add the link to your MarketHub too.
- Promote your blog through all available channels. If you have a Twitter account, tweet your most recent article. If you run a newsletter, send out an update about your blog. If you’re a handmade seller, use the same means you use to promote your items. Don’t forget to share your new blog in the forums!
- Leave comments on other blogs. Do you have a favorite blog you follow? Leave a comment, and make sure to include your blog link! You want to leave a worthwhile comment which adds to the post. Also be sure to seek out others that are new to blogging or have blogs similar to yours. Remember, blogging is also about making friends!
- Post high quality, original content often. You’ll probably want to update your blog at least twice a week with content people will want to read about. While you should be blogging about what you love, be sure to include education material as well. Posting your favorite recipe (always give credit if it's from somewhere else), a how-to tutorial, or tips for creating at prefect bar of soap can be helpful both for building creditability as a blogger and for keeping readers coming back to your blog. This also means proofreading your blog several times before you make a post!
- Offer giveaways and post interviews. Many bloggers use giveaways to drive traffic to their blog, and often make the requirements for entry as simple as leaving a comment. You can also give away one of your handmade products to both promote your blog and studio. Don’t forget to interview fellow artisans as well, this is great for making friends and encouraging others to link to your blog.
All blogs start off small. Promoting is an ongoing process. Also make sure to use your ArtFire Blog, as this provides entertainment to those already in your studio and keeps them coming back!
Sell Handmade Crafts Online
Have a question for the blog? Email it to Sara@ArtFire.com.
Have any other ideas for promoting one’s blog? Post them in the comments below!
Wednesday, July 21, 2010
Free Photo Editing Software: Response to Stacy
1:47 PM 37 Comments Photography
Sara, I’m trying to make my photos better, but I don’t have photoshop and can’t really afford it, so I’m having trouble editing them. Do you have any suggestions for free programs or ways I can edit without photoshop? Thanks in advance. Stacy.
Stacy,
There are many elements to good photography, and not having access to a good photo editor can certainly limit one’s ability to crop, fix bad lighting, and correct other small mistakes in photography.
Most computers come with some form of photo editing software. PCs generally come with some form of Windows Photo Gallery, which allows you to view and also make minor adjustments to photos (crop, resize, route, etc). Most Macs should come with a form of iPhoto, which allows you to also make similar adjustments. Try looking around in your program menu to see if you have any installed that you maybe didn’t know about. If you don’t already have an application installed or don’t like using the application you do have, don’t worry, there are a number of free alternatives you can try.
Our graphic designer, Jen, recommends Picasa, which she explains is like a mash-up of iPhoto and Flickr, as it’s both a web application and a desktop app. She’s also a fan of Picnik, which allows you to add in words and clip art on pictures, as well as special effects, color, and cropping. While they do have a premium option, if you just want to do basic editing, you should be satisfied with their free option.
For more photo editing alternatives, you can check out this article, which is full of good comparative information.
I hope that helps you find some software to better improve your photos. Remember, having a good photo editing software is only part of fixing up photos, be sure to check out our Photography Guide for more tricks.
 Sara
Sara
Sell Handmade Crafts Online
Have a question for the blog? Email it to Sara@ArtFire.com.
Have any photo editing software to recommend? Post your thoughts in the comments below.
Stacy,
There are many elements to good photography, and not having access to a good photo editor can certainly limit one’s ability to crop, fix bad lighting, and correct other small mistakes in photography.
Most computers come with some form of photo editing software. PCs generally come with some form of Windows Photo Gallery, which allows you to view and also make minor adjustments to photos (crop, resize, route, etc). Most Macs should come with a form of iPhoto, which allows you to also make similar adjustments. Try looking around in your program menu to see if you have any installed that you maybe didn’t know about. If you don’t already have an application installed or don’t like using the application you do have, don’t worry, there are a number of free alternatives you can try.
Our graphic designer, Jen, recommends Picasa, which she explains is like a mash-up of iPhoto and Flickr, as it’s both a web application and a desktop app. She’s also a fan of Picnik, which allows you to add in words and clip art on pictures, as well as special effects, color, and cropping. While they do have a premium option, if you just want to do basic editing, you should be satisfied with their free option.
For more photo editing alternatives, you can check out this article, which is full of good comparative information.
I hope that helps you find some software to better improve your photos. Remember, having a good photo editing software is only part of fixing up photos, be sure to check out our Photography Guide for more tricks.
Sell Handmade Crafts Online
Have a question for the blog? Email it to Sara@ArtFire.com.
Have any photo editing software to recommend? Post your thoughts in the comments below.
Thursday, July 15, 2010
Determining Shipping Costs: Response to Cynthia
1:30 PM 86 Comments General Selling
The thing that makes my brain tired is trying to figure out how to figure in shipping costs with a third-party payment system. For something you easily stuff into a Priority Mail box fine, but many of my pottery items weigh enough that they can cost anywhere from $15-$25 to ship UPS depending on the zone they are going to. This is kinda steep for a single $50-75 item.
Does one average the costs for all items and zones and "eat it" sometimes and get a more others?
Thanks for a great blog.
Found it via Twitter...
Cynthia
Cynthia,
This is a very good question, and one I had to consult with a few colleagues about. While you don’t want to overcharge too much on shipping because it can turn away customers, you don’t want to undercharge on shipping either, as you’ll go bankrupt. Taking the average, or a value slightly higher than the average, may be the best route. Generally it is standard to take the average shipping cost for each individual item (especially if you have items of varying size and weight) and attempt to maintain balance between orders which put you at a loss and those that you end up coming out ahead on. Both The United States Postal Service and FedEx have a shipping calculator available to help you determine shipping rates based on size and destination.
Some artisans choose to overestimate their shipping cost to prevent ending up at a loss, although it does have the potential to scare away potential customers or result in abandoned carts. You can however offer a refund if the actual shipping amount is less than the amount paid by the customer. This takes time, but it is one way around the problem.
Another potential solution would be to incorporate more of your shipping cost into your item cost. While this can result in the over-pricing of your item, keep in mind that many shoppers don’t always consider shipping costs when browsing, and can be turned off by seeing the total cost when checking out. Incorporating your shipping cost into the item’s price will leave the shopper with less of a surprise when they see the shipping cost. You can also ask in the item description for shoppers to note the shipping cost and explain why it is the price that it is.
All in all, there may be no easy solution for your shipping question, but there are some alternatives to consider. I hope this response helps, and let me know if you have additional questions!
 Sara
Sara
Sell Handmade Crafts Online
Have a question for the blog? Email it to Sara@ArtFire.com.
Have further thoughts on determining shipping price? Please leave them in the comments below.
Does one average the costs for all items and zones and "eat it" sometimes and get a more others?
Thanks for a great blog.
Found it via Twitter...
Cynthia
Cynthia,
This is a very good question, and one I had to consult with a few colleagues about. While you don’t want to overcharge too much on shipping because it can turn away customers, you don’t want to undercharge on shipping either, as you’ll go bankrupt. Taking the average, or a value slightly higher than the average, may be the best route. Generally it is standard to take the average shipping cost for each individual item (especially if you have items of varying size and weight) and attempt to maintain balance between orders which put you at a loss and those that you end up coming out ahead on. Both The United States Postal Service and FedEx have a shipping calculator available to help you determine shipping rates based on size and destination.
Some artisans choose to overestimate their shipping cost to prevent ending up at a loss, although it does have the potential to scare away potential customers or result in abandoned carts. You can however offer a refund if the actual shipping amount is less than the amount paid by the customer. This takes time, but it is one way around the problem.
Another potential solution would be to incorporate more of your shipping cost into your item cost. While this can result in the over-pricing of your item, keep in mind that many shoppers don’t always consider shipping costs when browsing, and can be turned off by seeing the total cost when checking out. Incorporating your shipping cost into the item’s price will leave the shopper with less of a surprise when they see the shipping cost. You can also ask in the item description for shoppers to note the shipping cost and explain why it is the price that it is.
All in all, there may be no easy solution for your shipping question, but there are some alternatives to consider. I hope this response helps, and let me know if you have additional questions!
Sell Handmade Crafts Online
Have a question for the blog? Email it to Sara@ArtFire.com.
Have further thoughts on determining shipping price? Please leave them in the comments below.
Thursday, July 8, 2010
Accepting New Payment Processors: Response to Sandy
11:07 AM 1 Comments General Selling
Sara,
I have a question about payments. I currently accept paypal in my shop, but I see other sellers use different things. I’m not really comfortable using check and money orders because I’ve heard of scams. should I try to accept different things or just stick to paypal.
Best,
Sandy
Sandy,
There’s no reason to limit your business to one payment method. Doing so will limit your customer reach, and can prevent users who don’t use PayPal from buying from you. Currently on ArtFire, sellers can choose to accept virtual payment options like Google Checkout and Amazon Checkout. While these processors have a different fee structure than PayPal and add additional accounts for you to manage, they can be worth it for the number of shoppers they open you up too. For example, while less people use Google Checkout than PayPal, the majority of Google Checkout users are male, affluent, and young. That’s a whole new audience for you to reach. Amazon Payments, on the other hand, opens you up all to Amazon’s user base, which consists of over 81 million users.
I understand your apprehension for accept checks and money orders, but there are ways of accepting these payment methods while protecting yourself from scams. Not long ago we published a guide on avoiding scams and frauds which addresses many issues involving checks and money orders. Educating yourself on these issues is the best way to stay safe from online scams, but it’s still your decision whether you want to accept these payment methods.
I hope that helps answer your questions about different payment methods. Remember, it’s up to you to determine which payment methods to add to your account, and it’s important to check out their fee structure first, to avoid any surprises. Let me know if you have additional questions.
 Sara
Sara
Sell Handmade Crafts Online
Do you have a question for me to answer on this blog? Email me: Sara@ArtFire.com.
Have any addition advice/thoughts on adding different payment processors? Add them in the comments section of this post.
I have a question about payments. I currently accept paypal in my shop, but I see other sellers use different things. I’m not really comfortable using check and money orders because I’ve heard of scams. should I try to accept different things or just stick to paypal.
Best,
Sandy
Sandy,
There’s no reason to limit your business to one payment method. Doing so will limit your customer reach, and can prevent users who don’t use PayPal from buying from you. Currently on ArtFire, sellers can choose to accept virtual payment options like Google Checkout and Amazon Checkout. While these processors have a different fee structure than PayPal and add additional accounts for you to manage, they can be worth it for the number of shoppers they open you up too. For example, while less people use Google Checkout than PayPal, the majority of Google Checkout users are male, affluent, and young. That’s a whole new audience for you to reach. Amazon Payments, on the other hand, opens you up all to Amazon’s user base, which consists of over 81 million users.
I understand your apprehension for accept checks and money orders, but there are ways of accepting these payment methods while protecting yourself from scams. Not long ago we published a guide on avoiding scams and frauds which addresses many issues involving checks and money orders. Educating yourself on these issues is the best way to stay safe from online scams, but it’s still your decision whether you want to accept these payment methods.
I hope that helps answer your questions about different payment methods. Remember, it’s up to you to determine which payment methods to add to your account, and it’s important to check out their fee structure first, to avoid any surprises. Let me know if you have additional questions.
Sell Handmade Crafts Online
Do you have a question for me to answer on this blog? Email me: Sara@ArtFire.com.
Have any addition advice/thoughts on adding different payment processors? Add them in the comments section of this post.
Wednesday, June 30, 2010
Writing Long Item Descriptions: Response to Barbara
2:52 PM 3 Comments General Selling
Hi, I have a question. How much do I really need to say in my product description? It takes a long time to write them and sometimes I feel a piece is self explanatory. Thanks, Barbara
Barbara,
A good description can take a long time to write, but it can be extremely helpful for the success of your product. A long description can be beneficial for SEO (Search Engine Optimization) and for buyer conversion. It has been proven that sellers who provide a longer description sell better, and if you spend time on the description of an item you can relist after selling, all the better.
Here are a few things you can add to your descriptions to make the longer:
Compare your Product to Alternatives – Does your specially-made handmade soap leave the user's skin softer than cow’s milk or vegetable oil soap? Be sure to say so in your description. Most shoppers don’t know the difference between ingredients and components of a piece, so show your expertise!
Give User Testimonials –Do you have kudos in your studio, or have you received an email from a customer thanking you for a specific product? Include it in your description! A buyer is more inclined to use your product if they know other shoppers have enjoyed using it as well. Note: To get the best SEO benefit from this, try not to reuse testimonials in multiple products.
Do Keyword Research – Try including a few search terms in your description you think shoppers might be looking for. Don’t overdo it, remember, you’re writing for a person, not a search engine. However, adding some keywords can help your SEO. Remember, every word of your description is another way for shoppers to find your product!
Make It Easy to Read – Use bullet points when you can, and make sure to write in short, clear paragraphs. You want to include a lot of information, but you don’t want to make it difficult for your readers! Double checking your description for proper grammar and spelling can also help you avoid making mistakes that turn buyers away.
I hope that helps! Let me know if you have any other questions for me.
 Sara
Sara
Sell Handmade Crafts Online
Have any other advice for writing good descriptions? Add it in the comments section of this post.
Barbara,
A good description can take a long time to write, but it can be extremely helpful for the success of your product. A long description can be beneficial for SEO (Search Engine Optimization) and for buyer conversion. It has been proven that sellers who provide a longer description sell better, and if you spend time on the description of an item you can relist after selling, all the better.
Here are a few things you can add to your descriptions to make the longer:
Compare your Product to Alternatives – Does your specially-made handmade soap leave the user's skin softer than cow’s milk or vegetable oil soap? Be sure to say so in your description. Most shoppers don’t know the difference between ingredients and components of a piece, so show your expertise!
Give User Testimonials –Do you have kudos in your studio, or have you received an email from a customer thanking you for a specific product? Include it in your description! A buyer is more inclined to use your product if they know other shoppers have enjoyed using it as well. Note: To get the best SEO benefit from this, try not to reuse testimonials in multiple products.
Do Keyword Research – Try including a few search terms in your description you think shoppers might be looking for. Don’t overdo it, remember, you’re writing for a person, not a search engine. However, adding some keywords can help your SEO. Remember, every word of your description is another way for shoppers to find your product!
Make It Easy to Read – Use bullet points when you can, and make sure to write in short, clear paragraphs. You want to include a lot of information, but you don’t want to make it difficult for your readers! Double checking your description for proper grammar and spelling can also help you avoid making mistakes that turn buyers away.
I hope that helps! Let me know if you have any other questions for me.
Sell Handmade Crafts Online
Have any other advice for writing good descriptions? Add it in the comments section of this post.
Wednesday, June 23, 2010
Customizing Your Blog: Response to Callie
3:13 PM 4 Comments Blogging
I have been following blogs from my reader for about a year now, and have finally picked up the courage to start my own blog! But now that I have it "set up" I don't know how to make it look any better than the basic options blogger has offered me. Is there a site out there that will walk me and anyone else new to this, through personalizing their blog. I know there are ways to use more than the 7 fonts offered originally. And I'm honestly not sure where to start or how to make it mine. Any suggestions or pointers would be great, so that I can be successful! Thanks in advance for any help you can provide!
- Callie from www.seriously-handmade.blogspot.com
Callie,
Thanks for the question! I had a peek at your blog and see you already have installed a template, but you wish to customize your blog even further. I’ve done some research and located a few guides which will help you add even more to your blog.
Blog Tutorial - Tips For Blog Templates & Blog Design In Photoshop – This guide will show you how to quickly create a banner for your blog using Photoshop. It can also show you some quick tricks to dressing up a photo to make it “pop” on your blog, and discusses things like color scheme and design elements.
Customize Your Blogger Template – This guide is specifically designed for blogger, and in additional to helping you layout your new banner on your blog, it also goes into some basic HTML for changing the width of your blog, adding a photo to your blog, and setting up your RSS feed.
To address your specific question about fonts, I found this great guide on Kevinandamanda.com which will show you how to use different fonts for your title font sidebar and even date. The best part is, visitors to your blog wouldn’t need to have these fonts installed beforehand to have them show up correctly. This guide does look rather technical and complex, so make sure you follow all of the instructions.
This should help you get started. Let me know if you have any additional questions by posting in the comments below.
 Sara
Sara
Sell Handmade Crafts Online
Do you have a question for me to answer on this blog? Email me: Sara@ArtFire.com.
Do you have other suggestions for customizing a blog? Leave them in the comments below.
- Callie from www.seriously-handmade.blogspot.com
Callie,
Thanks for the question! I had a peek at your blog and see you already have installed a template, but you wish to customize your blog even further. I’ve done some research and located a few guides which will help you add even more to your blog.
Blog Tutorial - Tips For Blog Templates & Blog Design In Photoshop – This guide will show you how to quickly create a banner for your blog using Photoshop. It can also show you some quick tricks to dressing up a photo to make it “pop” on your blog, and discusses things like color scheme and design elements.
Customize Your Blogger Template – This guide is specifically designed for blogger, and in additional to helping you layout your new banner on your blog, it also goes into some basic HTML for changing the width of your blog, adding a photo to your blog, and setting up your RSS feed.
To address your specific question about fonts, I found this great guide on Kevinandamanda.com which will show you how to use different fonts for your title font sidebar and even date. The best part is, visitors to your blog wouldn’t need to have these fonts installed beforehand to have them show up correctly. This guide does look rather technical and complex, so make sure you follow all of the instructions.
This should help you get started. Let me know if you have any additional questions by posting in the comments below.
Sell Handmade Crafts Online
Do you have a question for me to answer on this blog? Email me: Sara@ArtFire.com.
Do you have other suggestions for customizing a blog? Leave them in the comments below.
Thursday, June 17, 2010
Adding Emails to Signatures: Response to Anonymous
10:35 AM 0 Comments Email
Hello. I noticed some people have links to their shops and stuff at the bottom of their emails. Do you know how to set that up? Thanks.
Anonymous
Anonymous,
I believe you are referring to email signatures. Email signatures appear at the bottom of every email you send out and allow you to share your studio link with whoever you’re emailing. They’re a great way to share your studio address with new people or direct people back to your studio.
Since all email clients are different, I’ll show you how to add a signature in Outlook, Hotmail, and Yahoo.
Outlook
Depending on your version of Outlook, this process could differ slightly. If these instructions don’t work for you, open up Outlook Help and search for “Signatures” to learn how to set it up in your version.
Start by opening Outlook. On the taskbar, select the “Tools” dropdown. From here, select “Options.” This will cause the Options box to pop up. On here, select the “Mail Format” tab, and then “Signatures”.

Here, you can create a new signature, which you can name whatever you want. It is VERY IMPORTANT that you link this signature to an email account by selecting an account on the right. In the screenshot above, the account selected is “Microsoft Exchange”. Also make sure you set this signature to appear for new messages, replies and forwards.
In the text box below, enter your signature. This can be as simple as your name in a link to your studio. You can use the editor to add a picture or banner for your studio if you wish. Remember that not everyone uses the same mail system as you, and some mail systems will strip out pictures and html, so you might just want to write out the URL for your studio for people who don’t read emails in HTML and make it a clickable link for those that do.
Next, click “OK” and navigate back to your inbox. Open up a new message to test whether your signature is showing up. If it is, you’re done, yay! If it’s not, you’ll have to check out Outlook’s help to see what went wrong.
Hotmail
Start by logging into your account and clicking the “Mail” link at the top of the page. While in your inbox, select the “Options” dropdown and select “More Options.”

Under the “Customize your mail” heading, select “Personal e-mail signature”.

In the text box, enter in your signature. It doesn’t look like you can add an image with this one, but you can add emoticons and play around with the fonts. Make sure to hit “Save” once you’re done!
Double check by opening up a new message to see if your signature worked, otherwise refer to Hotmail Help.
Yahoo
Yahoo is set up similarly to Hotmail. Navigate to your Yahoo mail by going to mail.yahoo.com. Once you’ve logged in, click the tiny blue link for “options” on the right directly above the advertisements and select “more options” from the drop down menu.

On the Yahoo Mail options screen, select “Signature” on the left.
Here you can enter your signature. Click the “Rich Text” link on the right for additional options, such as hyperlinks and emoticons. Make sure you toggle “Show a signature on all outgoing messages” and click the “Save Changes” button when finished.

Double check to make sure your signature is showing up by opening up a new message. If you’re having trouble getting it to show up properly, consult Yahoo Help.
Most other email clients should have a similar way of setting up a signature, however, not all of them have that option. If your client doesn’t offer a signature service, remember you can also manually add your URL at the end of your email.
 Sara
Sara
Sell Handmade Crafts Online
Do you have a question for me to answer on this blog? Email me: Sara@ArtFire.com.
Do you have other suggestions for using signatures? Add them in the comments below.
Anonymous
Anonymous,
I believe you are referring to email signatures. Email signatures appear at the bottom of every email you send out and allow you to share your studio link with whoever you’re emailing. They’re a great way to share your studio address with new people or direct people back to your studio.
Since all email clients are different, I’ll show you how to add a signature in Outlook, Hotmail, and Yahoo.
Outlook
Depending on your version of Outlook, this process could differ slightly. If these instructions don’t work for you, open up Outlook Help and search for “Signatures” to learn how to set it up in your version.
Start by opening Outlook. On the taskbar, select the “Tools” dropdown. From here, select “Options.” This will cause the Options box to pop up. On here, select the “Mail Format” tab, and then “Signatures”.

Here, you can create a new signature, which you can name whatever you want. It is VERY IMPORTANT that you link this signature to an email account by selecting an account on the right. In the screenshot above, the account selected is “Microsoft Exchange”. Also make sure you set this signature to appear for new messages, replies and forwards.
In the text box below, enter your signature. This can be as simple as your name in a link to your studio. You can use the editor to add a picture or banner for your studio if you wish. Remember that not everyone uses the same mail system as you, and some mail systems will strip out pictures and html, so you might just want to write out the URL for your studio for people who don’t read emails in HTML and make it a clickable link for those that do.
Next, click “OK” and navigate back to your inbox. Open up a new message to test whether your signature is showing up. If it is, you’re done, yay! If it’s not, you’ll have to check out Outlook’s help to see what went wrong.
Hotmail
Start by logging into your account and clicking the “Mail” link at the top of the page. While in your inbox, select the “Options” dropdown and select “More Options.”

Under the “Customize your mail” heading, select “Personal e-mail signature”.

In the text box, enter in your signature. It doesn’t look like you can add an image with this one, but you can add emoticons and play around with the fonts. Make sure to hit “Save” once you’re done!
Double check by opening up a new message to see if your signature worked, otherwise refer to Hotmail Help.
Yahoo
Yahoo is set up similarly to Hotmail. Navigate to your Yahoo mail by going to mail.yahoo.com. Once you’ve logged in, click the tiny blue link for “options” on the right directly above the advertisements and select “more options” from the drop down menu.
On the Yahoo Mail options screen, select “Signature” on the left.
Here you can enter your signature. Click the “Rich Text” link on the right for additional options, such as hyperlinks and emoticons. Make sure you toggle “Show a signature on all outgoing messages” and click the “Save Changes” button when finished.

Double check to make sure your signature is showing up by opening up a new message. If you’re having trouble getting it to show up properly, consult Yahoo Help.
Most other email clients should have a similar way of setting up a signature, however, not all of them have that option. If your client doesn’t offer a signature service, remember you can also manually add your URL at the end of your email.
Sell Handmade Crafts Online
Do you have a question for me to answer on this blog? Email me: Sara@ArtFire.com.
Do you have other suggestions for using signatures? Add them in the comments below.
Friday, June 11, 2010
Preparing for the Holidays: Response to Anna Marie
3:21 PM 5 Comments General Selling
Christmas has always been my busiest time for my business. I know it’s still a ways away, but is there anything I can do now to make this Christmas more successful and easier for me? Or is it still too early?
Thanks in advance.
Anne Marie.
Anne Marie,
In business, it is never too early to prepare for the holiday season. That thought scares may people, but there’s no reason to dread the holidays, especially because it is the most profitable time for many businesses. With some advice from our team, I’ve put together a short list of ways to prepare for the holiday season to both avoid last-minute stress and make the season better for artisan sellers.
Top Ways to Prepare for the Fourth Quarter Shopping Season:
-Make Product. You should already be researching new trends and ideas for holiday items. It’s important you have a wide variety of pieces to choose from, so make sure to set some time aside from making new product before the holiday shopping season begins (and remember, this can begin as early as September). Also take into account what sold well last year, and try to expand upon those themes.
-Do Some SEO Testing. Search Engine Optimization (SEO) can be very tricky, but luckily you don’t need in-depth knowledge to test which keywords work best for you. First, research some common keywords for your products using the tools outlined in this guide. Next, do some A/B testing on these keywords. Try changing around the keywords in one of your item’s titles and noting any change you see over the following weeks. You can also try changing a paragraph in your description, or running tests on similar items. More ideas for SEO testing are outlined at the end of this SEO Roundup. The goal in doing these tests is to find the best arrangement of keywords to get your items the most exposure possible in time for the holidays.
Start Brainstorming Deals and Sales You Plan to Offer. It’s a good idea to have any special deals or sales already in place at the beginning of November. Even if it’s a Black Friday or Christmas sale, it’s can’t hurt to have it already going on ahead of time to beat the rush. Brainstorm how you can promote your sale too—it wouldn’t do any good to have a coupon sale or shopping discount if no one has heard of it!
Check Your Packaging Supplies. Make sure you have plenty of shipping goods ready to go before the holiday season begins. Buying them in bloke now will help reduce costs later. Also make sure you have plenty of holiday gift wrap available to offer as an extra bonus to your customers.
 Sara
Sara
Sell Handmade Crafts Online
Do you have a question for me to answer on this blog? Email me: Sara@ArtFire.com.
Do you have any other suggestions for preparing for the holidays? Add them in a comment below.
Thanks in advance.
Anne Marie.
Anne Marie,
In business, it is never too early to prepare for the holiday season. That thought scares may people, but there’s no reason to dread the holidays, especially because it is the most profitable time for many businesses. With some advice from our team, I’ve put together a short list of ways to prepare for the holiday season to both avoid last-minute stress and make the season better for artisan sellers.
Top Ways to Prepare for the Fourth Quarter Shopping Season:
-Make Product. You should already be researching new trends and ideas for holiday items. It’s important you have a wide variety of pieces to choose from, so make sure to set some time aside from making new product before the holiday shopping season begins (and remember, this can begin as early as September). Also take into account what sold well last year, and try to expand upon those themes.
-Do Some SEO Testing. Search Engine Optimization (SEO) can be very tricky, but luckily you don’t need in-depth knowledge to test which keywords work best for you. First, research some common keywords for your products using the tools outlined in this guide. Next, do some A/B testing on these keywords. Try changing around the keywords in one of your item’s titles and noting any change you see over the following weeks. You can also try changing a paragraph in your description, or running tests on similar items. More ideas for SEO testing are outlined at the end of this SEO Roundup. The goal in doing these tests is to find the best arrangement of keywords to get your items the most exposure possible in time for the holidays.
Start Brainstorming Deals and Sales You Plan to Offer. It’s a good idea to have any special deals or sales already in place at the beginning of November. Even if it’s a Black Friday or Christmas sale, it’s can’t hurt to have it already going on ahead of time to beat the rush. Brainstorm how you can promote your sale too—it wouldn’t do any good to have a coupon sale or shopping discount if no one has heard of it!
Check Your Packaging Supplies. Make sure you have plenty of shipping goods ready to go before the holiday season begins. Buying them in bloke now will help reduce costs later. Also make sure you have plenty of holiday gift wrap available to offer as an extra bonus to your customers.
Sell Handmade Crafts Online
Do you have a question for me to answer on this blog? Email me: Sara@ArtFire.com.
Do you have any other suggestions for preparing for the holidays? Add them in a comment below.
Wednesday, June 9, 2010
Why and How to Add Alt Text to Images: Response to Jay
3:51 PM 1 Comments Blogging
Hi Sara,
I have been reading up on SEO lately as suggested in the forums so my shop gets more traffic. Lately I’ve seen people talk about “alt tags” for images. What are alt tags, and should I be using them?
Thanks,
Jay
Jay,
Great question! I had to consult our SEO guru about this one. Alt tags or alt text basically tells a computer or search engine what an image contains. For example, if you had a picture of a piece of handmade soap you were uploading to your blog, a good alt text would be, “Oatmeal Goat’s Milk Soap Handmade by Jay.” This can be helpful both for SEO, as well as those readers are unable to see your images.
While you can’t really add alt text to your listings, you do have an option to add it on some blogging services. Sadly, Blogger doesn’t give you an easy place to fill this in, but you can add it to your image’s HTML.
Adding Alt Text to an Item’s HTML on Blogger
First, decide on a good alt text for your image. This should be about a sentence in length and accurately describe the item.
Open up a new post in Blogger, or your blog service of choice. It will probably be easier if you import the picture you wish to use first before writing the post.
Locate an “Edit HTML” feature on your blog editor. This appears as a tab on blogger.

< div class="separator" style="clear: both; text-align: center;">
< a href= "https://blogger.googleusercontent.com/img/b/R29vZ2xl/AVvXsEg2xeIyLV2Wi1WZwPZesB31_MnX3iGVdVGeBMUHB2hoEVjdm-YuuVgAJ3pZiadHy8vtt3tmve_Xp8yWlzpipqOrHrEW8iW_9F5dkfv25b2stRiHIxLA0mcAQfh0-w4vkrtiulR8cG41aOye/s1600/334_avatar_thumb_crop.jpg" imageanchor="1" style="margin-left: 1em; margin-right: 1em;">< img border="0" src=" https://blogger.googleusercontent.com/img/b/R29vZ2xl/AVvXsEg2xeIyLV2Wi1WZwPZesB31_MnX3iGVdVGeBMUHB2hoEVjdm-YuuVgAJ3pZiadHy8vtt3tmve_Xp8yWlzpipqOrHrEW8iW_9F5dkfv25b2stRiHIxLA0mcAQfh0-w4vkrtiulR8cG41aOye/s320/334_avatar_thumb_ crop.jpg" />
The text in bold above (note: it will not be bold in your html editor, and has only been bolded to make it easier to identify here)"
The code to be added in: alt="This is a picture of Sara!"
< div class="separator" style="clear: both; text-align: center;">
< div class="separator" style="clear: both; text-align: center;">
< a href="http://4.bp.blogspot.com/ _jjFt29uruVo/TBACIcAw9VI/AAAAAAAAAEc/YD7Qge9uV_s/s1600/334_avatar_thumb_crop.jpg" imageanchor="1" style="margin-left: 1em; margin-right: 1em;">< img alt="This is a picture of Sara!" border="0" src="http://4.bp.blogspot.com/ _jjFt29uruVo/TBACIcAw9VI/AAAAAAAAAEc/YD7Qge9uV_s/s320/334_ avatar_thumb_crop.jpg" />
Make sure you don’t add anything else to your image tag or else your photo might not appear properly.
After you’d added your alt text, go back to the regular editor. This appears as the “Compose” tab on blogger.

Finish writing up your blog post and publish it.
To test to see if your alt text is working, view the finished post on your blog. On Firefox, you can disable images by clicking Tools then Options and then unclicking the box labeled “load images automatically.”

Now refresh your blog. Your images in your post should now be appearing as linked alt text.

Make sure you turn images back on the same way you turned them off. You can now add alt text anywhere you can edit html. Use it to help improve your search ranking for keywords and to help those unable to view images when viewing your blog.
Hope that helps answer your questions! Let me know if you have any more. :)
Sara
Sell Handmade Crafts Online
Do you have a question for me to answer on this blog? Email me: Sara@ArtFire.com.
Sell Handmade Crafts Online
Do you have a question for me to answer on this blog? Email me: Sara@ArtFire.com.
Friday, June 4, 2010
Getting Followers and Promoting on Twitter: Response to Cindy
1:54 PM 2 Comments Twitter
Sara,
I’ve been hearing alot lately about twitter. I’ve just signed up for an account, but I’m completely lost. How do I get friends? How to I promote my shop? Please help.
Cindy
Cindy,
Welcome to Twitter! For new users, Twitter can be rather confusing at first. If you don’t know much about the micro-blogging site, I recommend you check out our Twitter 101 guide first.
Getting “Friends” and Followers on Twitter – If you’ve just started your Twitter account, chances are, you have no one following your tweets! What you’ll first need to do is follow some new people. You can use Twitter’s search (available on your left navigational bar on your Twitter home page) and people search to start finding people with similar interests to yours. For example, if you had a knitting shop, you could search for keywords like “knit”, “knitter”, or “knitting” to find people tweeting about those topics. You can also try finding people or companies you’re interested in with a lot of followers and follow some of those people. For example, if you sell on ArtFire, you might want to follow some of the people who follow ArtFire’s tweets.
Try following a few hundred (yes, hundred!) people and see where that gets you. Not everyone you follow will follow you back, but enough will check out your Twitter profile to gain you some followers. You can also try linking to your Twitter account from your MarketHub on ArtFire, or adding your Twitter username to a Handmade roster.
Promoting Once You’ve Got Friends and Followers—One of the fastest ways to lose followers on Twitter is to spam them with Direct Messages and @Replies about your studio. Instead, try to post the right blend of personal information and studio promotion. Share interesting finds online as well. Found a good crafty article? Share it with your followers. Found a new shop you think is really unique? Share it with your followers. Had an amusing experience on the way to work? Share it with you followers. Add a tweet in there about a special deal in your studio, or maybe a new piece you’ve just listed. It’s up to you to determine the right balance of personal information, fun links, and information about your business. You don’t want your Twitter account to be 100% promotional, although it doesn’t serve your studio to have it be 100% personal either.
I hope that helps you get started! Once you’re better acquainted with Twitter, you can check out our Social media guide to Mirco-Blogging to learn about tools and tricks to using the service. Happy twitting, and let me know if you have any other questions!
 Sara
Sara
Sell Handmade Crafts Online
Got a question for me to answer on this blog? Email me: Sara@ArtFire.com.
I’ve been hearing alot lately about twitter. I’ve just signed up for an account, but I’m completely lost. How do I get friends? How to I promote my shop? Please help.
Cindy
Cindy,
Welcome to Twitter! For new users, Twitter can be rather confusing at first. If you don’t know much about the micro-blogging site, I recommend you check out our Twitter 101 guide first.
Getting “Friends” and Followers on Twitter – If you’ve just started your Twitter account, chances are, you have no one following your tweets! What you’ll first need to do is follow some new people. You can use Twitter’s search (available on your left navigational bar on your Twitter home page) and people search to start finding people with similar interests to yours. For example, if you had a knitting shop, you could search for keywords like “knit”, “knitter”, or “knitting” to find people tweeting about those topics. You can also try finding people or companies you’re interested in with a lot of followers and follow some of those people. For example, if you sell on ArtFire, you might want to follow some of the people who follow ArtFire’s tweets.
Try following a few hundred (yes, hundred!) people and see where that gets you. Not everyone you follow will follow you back, but enough will check out your Twitter profile to gain you some followers. You can also try linking to your Twitter account from your MarketHub on ArtFire, or adding your Twitter username to a Handmade roster.
Promoting Once You’ve Got Friends and Followers—One of the fastest ways to lose followers on Twitter is to spam them with Direct Messages and @Replies about your studio. Instead, try to post the right blend of personal information and studio promotion. Share interesting finds online as well. Found a good crafty article? Share it with your followers. Found a new shop you think is really unique? Share it with your followers. Had an amusing experience on the way to work? Share it with you followers. Add a tweet in there about a special deal in your studio, or maybe a new piece you’ve just listed. It’s up to you to determine the right balance of personal information, fun links, and information about your business. You don’t want your Twitter account to be 100% promotional, although it doesn’t serve your studio to have it be 100% personal either.
I hope that helps you get started! Once you’re better acquainted with Twitter, you can check out our Social media guide to Mirco-Blogging to learn about tools and tricks to using the service. Happy twitting, and let me know if you have any other questions!
Sell Handmade Crafts Online
Got a question for me to answer on this blog? Email me: Sara@ArtFire.com.
Wednesday, June 2, 2010
Creating a YouTube Commercial: Response to Sarah
11:59 AM 3 Comments Youtube
Hi Sara,
I was wondering if you could talk about how to make a youtube commercial, and maybe provide some examples of good ones. I would love to make an interesting commercial, but I'm not sure where to start.
Thanks,
Sarah
Sarah,
If used properly, YouTube commercials and videos can be a powerful tool for marketing your store. Since creating videos can be a complex art, I’ll just go into some basic information in this post. For more detailed information on creating a YouTube account, promoting yourself on YouTube, and even some basic filming tips, check out this guide.
First, figure out what kind of commercial you’d like to make. If you don’t have a video camera, your best option would be to create a slideshow of product images with music, similar to this video created by ArtFire seller Swank:
Such videos can be created using most basic video editing software. If you don’t have any installed on your computer, check out these five free ones.
If you do have a video camera, you could try making an educational video. Videos that show off a tutorial or offer business tips can be a great way to build your business’s credibility. ArtFire seller WildChildDzigns has made a number of videos (you can check out her YouTube Channel here), on business and fashion advice as well as general videos which show off new products.
Regardless of what kind of video you create, it's important you promote it. Post it in your blog, tweet it, or show it off on Facebook!
I hoped this answer a few basic questions you had about creating YouTube videos. Let me know if you have any other questions.
 Sara
Sara
Sell Handmade Crafts Online
Got a question for me to answer on this blog? Email me: Sara@ArtFire.com.
I was wondering if you could talk about how to make a youtube commercial, and maybe provide some examples of good ones. I would love to make an interesting commercial, but I'm not sure where to start.
Thanks,
Sarah
Sarah,
If used properly, YouTube commercials and videos can be a powerful tool for marketing your store. Since creating videos can be a complex art, I’ll just go into some basic information in this post. For more detailed information on creating a YouTube account, promoting yourself on YouTube, and even some basic filming tips, check out this guide.
First, figure out what kind of commercial you’d like to make. If you don’t have a video camera, your best option would be to create a slideshow of product images with music, similar to this video created by ArtFire seller Swank:
Such videos can be created using most basic video editing software. If you don’t have any installed on your computer, check out these five free ones.
If you do have a video camera, you could try making an educational video. Videos that show off a tutorial or offer business tips can be a great way to build your business’s credibility. ArtFire seller WildChildDzigns has made a number of videos (you can check out her YouTube Channel here), on business and fashion advice as well as general videos which show off new products.
Regardless of what kind of video you create, it's important you promote it. Post it in your blog, tweet it, or show it off on Facebook!
I hoped this answer a few basic questions you had about creating YouTube videos. Let me know if you have any other questions.
Sell Handmade Crafts Online
Got a question for me to answer on this blog? Email me: Sara@ArtFire.com.
Wednesday, May 26, 2010
Adding a Watermark: Response to Elise
2:08 PM 120 Comments Photography
I would like to sell my photographs on Artfire, but I need to watermark them before posting them. How do I watermark my photos?
Elise
Elise,
Adding a Watermark to photos is generally a good idea for handmade sellers, and necessary for photographers to protect their work.
There are lots of ways to add a watermark to photos, but you will need some kind of photo editing software to do so. I’ve put together a brief tutorial on adding a watermark in Photoshop, since that tends to be one most popular photo editing program, but if you don’t have Photoshop you can check out this HandmadeNews article offering brief reviews on similar software.
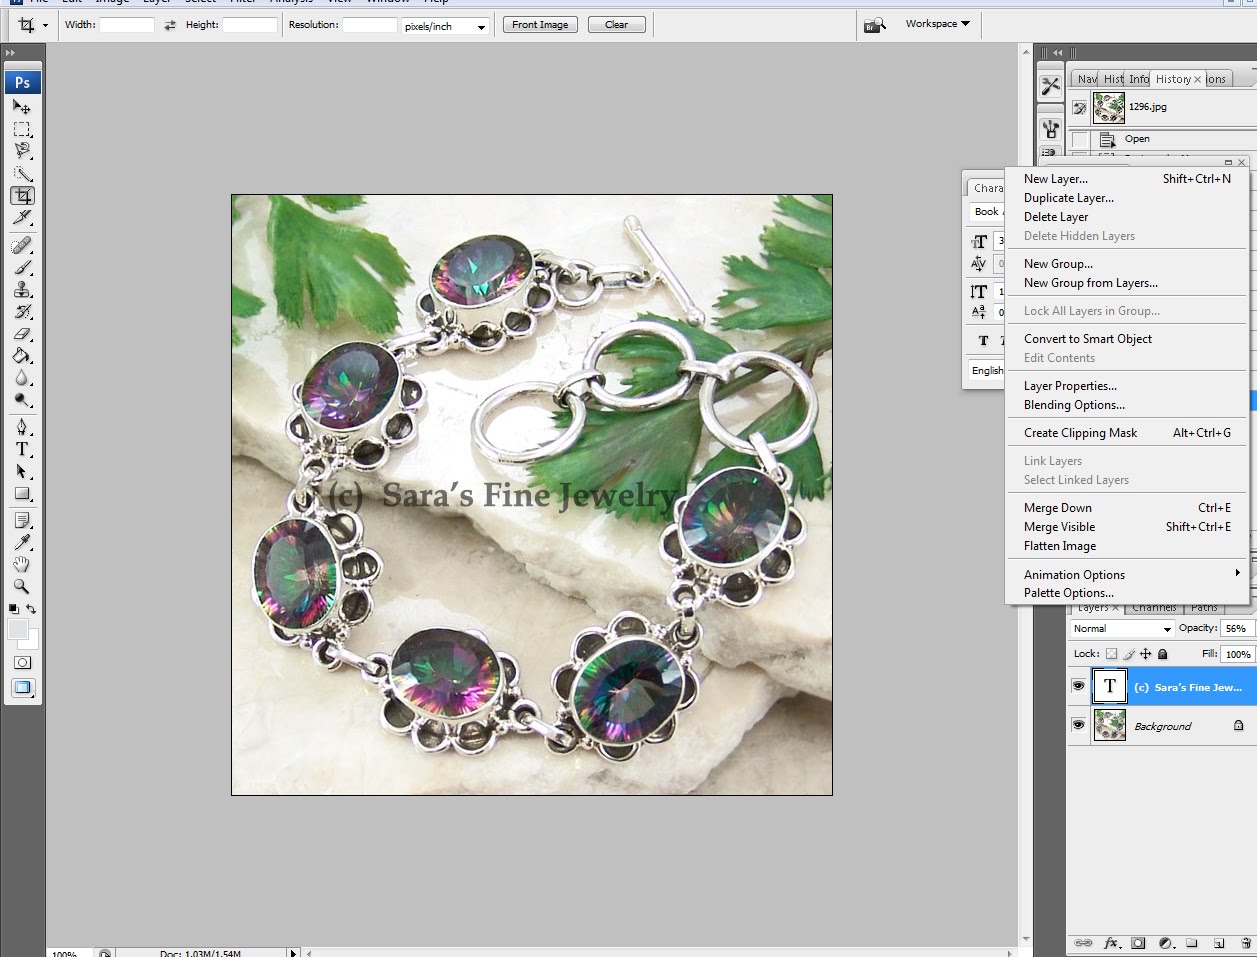
Adding a Watermark with Photoshop:
Step 1: Prepare Your Photo
Start by transferring your photo onto your computer. For this example, we’re going to use a photo of a nice bracelet.

Step 2: Adding Text
Open the file in Photoshop. Using the Type Tool (shown as a “T” on the left toolbar) write your watermark. This is can be as simple as your business name with a copyright symbol © and the date. It’s generally best to put this in the middle of the picture so it can’t be easily cropped out, and be sure to make it nice and big.

Some artisans will stop at this step, but to make the watermark look professional, it helps to make the watermark somewhat see-through.
Step 3: Making the Watermark Transparent
Locate the “Layers” window. (This window might be “hidden” if you don’t use it much, but you can make it visible again by selecting the Windows tab from the File menu and going down to “Layers” to make sure that it is checked and visible.) Select the Type layer with your watermark text. Just above the layer, you should see an opinion for “Opacity” click this and using the scrollbar, determine how transparent you want your watermark to be. Generally, you don’t want to distract from the image, but you do want people to notice it. For my example, I found 56% to be perfect.

Step 4: Flatten and Save
From the Layer Menu, select “Flatten Image” to get rid of the extra layers.
 Next, save your image, making sure it is saved as a .jpeg and not a .psd file. Now you can upload it to your ArtFire studio and list it for as item to sell. Just make sure to include in your item description that the actual photo wouldn’t contain the watermark!
Hope that helps you get started. Let me know if you have any other questions!
 Sara
Sara
Sell Handmade Crafts Online
Elise
Elise,
Adding a Watermark to photos is generally a good idea for handmade sellers, and necessary for photographers to protect their work.
There are lots of ways to add a watermark to photos, but you will need some kind of photo editing software to do so. I’ve put together a brief tutorial on adding a watermark in Photoshop, since that tends to be one most popular photo editing program, but if you don’t have Photoshop you can check out this HandmadeNews article offering brief reviews on similar software.
Adding a Watermark with Photoshop:
Step 1: Prepare Your Photo
Start by transferring your photo onto your computer. For this example, we’re going to use a photo of a nice bracelet.

Step 2: Adding Text
Open the file in Photoshop. Using the Type Tool (shown as a “T” on the left toolbar) write your watermark. This is can be as simple as your business name with a copyright symbol © and the date. It’s generally best to put this in the middle of the picture so it can’t be easily cropped out, and be sure to make it nice and big.

Some artisans will stop at this step, but to make the watermark look professional, it helps to make the watermark somewhat see-through.
Step 3: Making the Watermark Transparent
Locate the “Layers” window. (This window might be “hidden” if you don’t use it much, but you can make it visible again by selecting the Windows tab from the File menu and going down to “Layers” to make sure that it is checked and visible.) Select the Type layer with your watermark text. Just above the layer, you should see an opinion for “Opacity” click this and using the scrollbar, determine how transparent you want your watermark to be. Generally, you don’t want to distract from the image, but you do want people to notice it. For my example, I found 56% to be perfect.
Step 4: Flatten and Save
From the Layer Menu, select “Flatten Image” to get rid of the extra layers.
Hope that helps you get started. Let me know if you have any other questions!
Sell Handmade Crafts Online
Friday, May 21, 2010
Sharing Personal Information Online: Response to Anonymous
2:40 PM 4 Comments Facebook, Twitter
There is a great deal of hype everywhere that giving our private information on Twitter/Facebook is very risky. I think this should be covered because as for me, I am very guarded who I join/what I say/and my profiles are empty. I only give information related to my shop, not my personal information like birthdates, anything personal. My local news stations have had some terrible horror stories and are warning people to exercise care in using these social networks? Do you have any advice?
Anonymous
Anonymous,
As a business owner, it is your own choice how much information you share. While sharing too much can be damaging, so can sharing too little. If you’re going to do business online, you’ll have to share some information. You have to share enough information for people to believe you are a real person who wouldn’t scam them. It can help draw customers (especially in the handmade market) to brand your business as being personal and share your name (for credibility) and your story (to allow the customer to connect with you). However, where you draw the line after that is up to you and your own comfort level.
A lot of users choose to create a Facebook Fan Page for their studio to market themselves on Facebook, and keep their personal Facebook account set to private. This way they can allow people to fan their business page on Facebook but save their personal account for connecting with friends and family. Many people do the same thing with Twitter as well.
I hope that answered a few of your questions. This can be hard topic to properly address, but if you’re really concerned about your private information, I’d recommend reading over the Terms of Service and privacy Policy of any site you join, social media related or otherwise, to determine if they are able to share your information.
 Sara
Sara
Sell Handmade Crafts Online
Got a question for me to answer on this blog? Email me: Sara@ArtFire.com.
Anonymous
Anonymous,
As a business owner, it is your own choice how much information you share. While sharing too much can be damaging, so can sharing too little. If you’re going to do business online, you’ll have to share some information. You have to share enough information for people to believe you are a real person who wouldn’t scam them. It can help draw customers (especially in the handmade market) to brand your business as being personal and share your name (for credibility) and your story (to allow the customer to connect with you). However, where you draw the line after that is up to you and your own comfort level.
A lot of users choose to create a Facebook Fan Page for their studio to market themselves on Facebook, and keep their personal Facebook account set to private. This way they can allow people to fan their business page on Facebook but save their personal account for connecting with friends and family. Many people do the same thing with Twitter as well.
I hope that answered a few of your questions. This can be hard topic to properly address, but if you’re really concerned about your private information, I’d recommend reading over the Terms of Service and privacy Policy of any site you join, social media related or otherwise, to determine if they are able to share your information.
Sell Handmade Crafts Online
Got a question for me to answer on this blog? Email me: Sara@ArtFire.com.
Thursday, May 20, 2010
Simple Photography Tips: Response to Carol
2:32 PM 1 Comments Photography
I was wondering if you could give me advice on pictures. I know my pics aren’t great but I don’t have a fancy camera or lightbox or anything like that. Is there a way to take good pics without those things?
Thanks you.
Carol
Carol,
Pictures can be a very important part of an item’s listing. As the buyer cannot hold the item in their hands when shopping online, the photos have to provide the visual stimulation needed for buyers to complete a sale. Here are a few tips for product photography without special equipment that can help your photos:
-If you don’t have a tripod, try resting the camera on a solid surface. This will prevent the camera from moving while you shot and help you avoid tilted or blurry pictures.
-If you don’t have a light box, try a windowsill. Natural light can make a huge difference with photos. Try turning off your indoor lights and placing what you want to photograph on a windowsill or in light from outside. You’ll be surprised at what a difference it can make!
-Take A LOT of pictures. Even if it’s of the same shot, having lots of pictures to choose form when listing can help with better pictures. Also be sure to take advantage of how many photos are allowed on the venue you are using. If they allow up to four photos, use all four. If they allow ten, use all ten! Having lots of photos will help buyers get a better idea of the product you are selling and reduce their uncertainty about buying from you.
If you need more information on photography, check out our Photography Guide for Products. You can also try asking artisans whose photos you admire if they can offer any advance.

Sara
Sell Handmade Crafts Online
Got a question for me to answer on this blog? Email me: Sara@ArtFire.com.
Thanks you.
Carol
Carol,
Pictures can be a very important part of an item’s listing. As the buyer cannot hold the item in their hands when shopping online, the photos have to provide the visual stimulation needed for buyers to complete a sale. Here are a few tips for product photography without special equipment that can help your photos:
-If you don’t have a tripod, try resting the camera on a solid surface. This will prevent the camera from moving while you shot and help you avoid tilted or blurry pictures.
-If you don’t have a light box, try a windowsill. Natural light can make a huge difference with photos. Try turning off your indoor lights and placing what you want to photograph on a windowsill or in light from outside. You’ll be surprised at what a difference it can make!
-Take A LOT of pictures. Even if it’s of the same shot, having lots of pictures to choose form when listing can help with better pictures. Also be sure to take advantage of how many photos are allowed on the venue you are using. If they allow up to four photos, use all four. If they allow ten, use all ten! Having lots of photos will help buyers get a better idea of the product you are selling and reduce their uncertainty about buying from you.
If you need more information on photography, check out our Photography Guide for Products. You can also try asking artisans whose photos you admire if they can offer any advance.
Sara
Sell Handmade Crafts Online
Got a question for me to answer on this blog? Email me: Sara@ArtFire.com.
Wednesday, May 19, 2010
Things to Consider When Pricing: Response to Anonymous
1:58 PM 1 Comments General Selling
Hello there,
Something that would be good for the blog is advice on pricing as SO many newbies ask about it in the forums so guidelines would be good.
thanks
Anonymous
Dear Anonymous,
Price can be a touchy subject, but it is nonetheless an important one. I’ll only go into this topic briefly, as there are many guides available online for specific pricing questions. While there are a lot of aspects of pricing (cost of materials, cost of labor, etc), I feel that market research tends to be one of the most important. In this case, market research involves looking at items similar to yours and noting their general price. What does your item usually sell for? Once you have a good idea, you can take into account the amount of time it took to make the item, the skill it took, and the cost of materials.
If you’re planning to charge more for your items, make sure you say why in the description. Was this item made with special material? Will it last longer? How long did it take to make it? Is it of higher quality? Remember, you can also show the buyer how the item is worth the extra cost with pictures. If you’re listing an expensive item, be sure use a lot of your pictures to show off your piece!
Lastly, remember that pricing an item too low can turn a buyer away the same as pricing an item too high.
Hope that helps! Drop me a line if you have additional questions!
 Sara
Sara
Sell Handmade Crafts Online
Something that would be good for the blog is advice on pricing as SO many newbies ask about it in the forums so guidelines would be good.
thanks
Anonymous
Dear Anonymous,
Price can be a touchy subject, but it is nonetheless an important one. I’ll only go into this topic briefly, as there are many guides available online for specific pricing questions. While there are a lot of aspects of pricing (cost of materials, cost of labor, etc), I feel that market research tends to be one of the most important. In this case, market research involves looking at items similar to yours and noting their general price. What does your item usually sell for? Once you have a good idea, you can take into account the amount of time it took to make the item, the skill it took, and the cost of materials.
If you’re planning to charge more for your items, make sure you say why in the description. Was this item made with special material? Will it last longer? How long did it take to make it? Is it of higher quality? Remember, you can also show the buyer how the item is worth the extra cost with pictures. If you’re listing an expensive item, be sure use a lot of your pictures to show off your piece!
Lastly, remember that pricing an item too low can turn a buyer away the same as pricing an item too high.
Hope that helps! Drop me a line if you have additional questions!
Sell Handmade Crafts Online
Tuesday, May 18, 2010
Posting Items to Your Facebook Feed: Response to Mary
12:44 PM 0 Comments Facebook
How do I promote my items on my Facebook news feed? I am simply lost on that one.
Thanks. Mary
Mary,
To promote your items, just post the URL of one of your items in your Facebook status update. Once you post a link, Facebook should recognize it as a link and pull the item’s picture (although you might have to use the arrows below the picture to sort through to find the right one for the link). You can then include an update to your friends to let them know more about the link, such as, “Check out this new banana scented handmade soap I just posted to my store!”
If you need more information on promoting your store on Facebook, be sure and check out my Facebook Guide.
Hope that helps, let me know if you have any other questions!
 Sara
Sara
Sell Handmade Crafts Online
Thanks. Mary
Mary,
To promote your items, just post the URL of one of your items in your Facebook status update. Once you post a link, Facebook should recognize it as a link and pull the item’s picture (although you might have to use the arrows below the picture to sort through to find the right one for the link). You can then include an update to your friends to let them know more about the link, such as, “Check out this new banana scented handmade soap I just posted to my store!”
If you need more information on promoting your store on Facebook, be sure and check out my Facebook Guide.
Hope that helps, let me know if you have any other questions!
Sell Handmade Crafts Online
Monday, May 17, 2010
Response to Pam: Duplicate Content, Facebook, and Twitter
2:54 PM 1 Comments Facebook, Twitter
I love being able to import items from my Etsy shop to my ArtFire shop, but do I have to be worried about duplicate content and being penalized in Google searches?
I have a personal Facebook page and also my Fan page, although not all of my friends are also fans. What is the proper protocol for posting business related items...post to the fan page then post a link to the first post from my personal page? I don't want to "spam" my friends, but they might be interested in my art, also.
I also have a Twitter account. What should I be Tweeting? How often?
Pam Geisel
For Quilts Sake
www.forquiltssake.com
www.forquiltssake.artfire.com
Pam,
Wow, those are a lot of good questions! I’ll try my best to answer them all in turn.
Question 1: Duplicate Content
While the listing pages for ArtFire and Etsy are very different, there is still the possibility of running into trouble with duplicate content. However, this can easily taken care of by using making a few changes to your imported item’s title and description. You don’t have to redo the listing, just make a few small changes. Making these changes can also be a helpful way to test which title or description works best for your listing so far as SEO (search engine optimization) goes. ArtFire has a guide for after you import you can check out to find more ways to tweak your listings.
Question 2: Facebook
This is really a personal preference, and really depends on your fans and friends. Some people will post every update they have for their fan page onto their personal profile, while others will keep their fan page and personal profile completely separate. You could try only posting important news to both your fan page and personal profile (for example, if you normally post every time you list a new item, only post it to your fan page, while for big sales and events, post to both accounts). You could also try just “liking” your fan page posts from your profile, as this will also show up on your friend’s news feeds without showing the full post. But again, it’s up to you to determine the right amount of promotion with your Facebook account. There really is no proper protocol, so it’s up to you to determine what works best!
Question 3: Twitter
I could probably devote any entire novel this to question, but I’ll try to keep it brief. With your Twitter account, you want to create the right balance of fun, personal updates, as well as business updates. I go over this in greater detail on my Twitter 101 Guide. You’ll want to try and incorporate Twitter into your daily promotional practices to get the best results from it. Start with about 3-10 tweets spaced out over a period of time throughout the day. To a new user this might sound like a lot, but you’ll be surprised how easy it can be once you’re used to it!
I hope that helps! Let me know if you have any other questions.
 Sara
Sara
Sell Handmade Crafts Online
I have a personal Facebook page and also my Fan page, although not all of my friends are also fans. What is the proper protocol for posting business related items...post to the fan page then post a link to the first post from my personal page? I don't want to "spam" my friends, but they might be interested in my art, also.
I also have a Twitter account. What should I be Tweeting? How often?
Pam Geisel
For Quilts Sake
www.forquiltssake.com
www.forquiltssake.artfire.com
Pam,
Wow, those are a lot of good questions! I’ll try my best to answer them all in turn.
Question 1: Duplicate Content
While the listing pages for ArtFire and Etsy are very different, there is still the possibility of running into trouble with duplicate content. However, this can easily taken care of by using making a few changes to your imported item’s title and description. You don’t have to redo the listing, just make a few small changes. Making these changes can also be a helpful way to test which title or description works best for your listing so far as SEO (search engine optimization) goes. ArtFire has a guide for after you import you can check out to find more ways to tweak your listings.
Question 2: Facebook
This is really a personal preference, and really depends on your fans and friends. Some people will post every update they have for their fan page onto their personal profile, while others will keep their fan page and personal profile completely separate. You could try only posting important news to both your fan page and personal profile (for example, if you normally post every time you list a new item, only post it to your fan page, while for big sales and events, post to both accounts). You could also try just “liking” your fan page posts from your profile, as this will also show up on your friend’s news feeds without showing the full post. But again, it’s up to you to determine the right amount of promotion with your Facebook account. There really is no proper protocol, so it’s up to you to determine what works best!
Question 3: Twitter
I could probably devote any entire novel this to question, but I’ll try to keep it brief. With your Twitter account, you want to create the right balance of fun, personal updates, as well as business updates. I go over this in greater detail on my Twitter 101 Guide. You’ll want to try and incorporate Twitter into your daily promotional practices to get the best results from it. Start with about 3-10 tweets spaced out over a period of time throughout the day. To a new user this might sound like a lot, but you’ll be surprised how easy it can be once you’re used to it!
I hope that helps! Let me know if you have any other questions.
Sell Handmade Crafts Online
Friday, May 14, 2010
Response to Glitter Designs: Free Blogging Services
3:28 PM 5 Comments
Dear sell Handmade crafts online:
I was looking into a blog to promote my shop and I wanted to know which service to use as right now I can not really afford to pay for a blog. I know there is blogspot which this blog is offered on but what are some other good free blogging options, and which is the best for a crafter like me?
Thanks much,
Glitter Designs
Dear Glitter Designs,
It's great that you've decided to start blogging! Blogging can be very rewarding and useful way to promote your business. Luckily for you, there are quite a few free blogging sites out there, in fact, there's too many to mention! I'll just go over a few of the most popular ones.
Blogger - Blogger is known for being low-maintenance and easy to set up. You have a lot of options for personalizing your blog, including the setting of your blog URL (www.(yourchoice).blogspot.com). It can be a great site to start on if you have no experience in blogging. You can manage multiple blogs from one blogger account and receive an RSS feed update in your dashboard of blogs you "follow." And of course, it's completely free!
WordPress - WordPress offers a lot of tools for the experienced blogger. While they do have a free service, they also have a paid option, which offers video hosting, ad free service, and increased storage. There's a lot more customization options available with WordPress, but it can be overwhelming to a new blogger. Unlike other blog platforms, WordPress has a few mobile applications available for smart phones.
LiveJournal - LiveJournal is probably one of the oldest "blog-like" platforms out there. LiveJournal has a lot more community options than most blogging platforms.You can set your profile/blog URL (yourchoice.livejournal.com) and they have free account option available but it does come with advertising. However, people who are more interested in the community aspect of blogging might want to try out LiveJournal.
Tumblr - Tumblr is another free site whose focus is on ease of use and customization. On Tumblr users can create a "tumblelog" or short-format blog. They also have some different types of blogging features allowing users to "reblog" (similar to Twitter retweeting), and "like" posts (similar to Facebook's "like" feature). On Tumblr members can post video, photos, quotes, links, chat, audio, and of course text.You can also set your own URL as www.(yourchoice).tumblr.com.
As for which of these services is the best, you'll have to decide for yourself! Play around with each of these platforms or other ones and decide which one works best for you. You can also check out our Social Media Guide to Blogging to learn how to get started writing blogs and the types of posts to make. If you're looking for more free blogging service, check out this Mashable article, 40+ Free Blog Hosting Platforms.
Thursday, May 13, 2010
Response to Alice: How to Set a Custom URL on Facebook
2:45 PM 5 Comments Facebook
Dear sell handmade crafts online blog,
sincerely,
Alice
Dear Alice,
Sounds like you're having trouble setting your vanity URL or username for your fan page. Don't worry though, I can walk you though how to do it.
Start by logging into Facebook.
In your browser bar, enter in the URL: http://www.facebook.com/username
Click the link at the bottom of the page reading "Set a username for your Pages".
Select your page from the dropdown menu.
Enter the username you'd like to appear in your page's URL. It might be easiest to make this the same as your shop name so people have no trouble finding your fan page. Remember you cannot change your username after it's been set.
After you've make sure that the username is available, click save.
Your Facebook vanity URL should now be set! Try evering in your new URL to see if it takes you to your page.
Hope that helps, let me know if you have other questions,
Sara
Sell Handmade Crafts Online
Subscribe to:
Posts (Atom)

